With IntelliJ IDEA create an empty project first.

Backend

Now, create the springBoot app(all kotlin).

add dependencies:

  • Spring Web
  • Spring Data JDBC
  • MySQL Driver
  • GraalVM Native Support
  • Lombok
  • Spring Security

Initialize Gradle with the Tencent mirror.

change settings.gradle.kts

pluginManagement {
    repositories {
        maven("https://mirrors.cloud.tencent.com/nexus/repository/gradle-plugins/")
        gradlePluginPortal()
        mavenCentral()
    }
}
dependencyResolutionManagement {
    repositories {
        maven("https://mirrors.cloud.tencent.com/nexus/repository/maven-public/")
        mavenCentral()
    }
}

Error arose: Cannot inline bytecode built with JVM target 17 into bytecode that is being built with JVM target 1.8. Please specify proper ‘-jvm-target’ option

This is a very common version mismatch error in Kotlin development. It happens because a dependency or a module in your project was compiled using Java 17, but your current module/project is configured to compile down to Java 1.8 (Java 8).
Kotlin cannot inline code from a higher Java version into a lower one because the lower version doesn’t understand the newer bytecode.

open build.gradle.kts

copy these things to it.

java {
    toolchain {
        languageVersion = JavaLanguageVersion.of(21)
    }
    
    // ...
}
 
kotlin {
    jvmToolchain(21)
    // ....
}
 
// make sure to include it all
dependencies {
    implementation("org.springframework.boot:spring-boot-starter-data-jdbc")
    implementation("org.springframework.boot:spring-boot-starter-security")
    implementation("org.jetbrains.kotlin:kotlin-reflect")
    compileOnly("org.projectlombok:lombok")
    developmentOnly("org.springframework.boot:spring-boot-devtools")
    runtimeOnly("com.mysql:mysql-connector-j")
    annotationProcessor("org.projectlombok:lombok")
    testImplementation("org.springframework.boot:spring-boot-starter-data-jdbc-test")
    testImplementation("org.springframework.boot:spring-boot-starter-security-test")
    testImplementation("org.jetbrains.kotlin:kotlin-test-junit5")
    testCompileOnly("org.projectlombok:lombok")
    testRuntimeOnly("org.junit.platform:junit-platform-launcher")
    testAnnotationProcessor("org.projectlombok:lombok")
    implementation("org.springframework.boot:spring-boot-starter-web")
}

rename application.properties to application.yaml

spring:
  application:
    name: backend
  datasource:
    driver-class-name: com.mysql.cj.jdbc.Driver
    url: jdbc:mysql://localhost:3306/study?useUnicode=true&characterEncoding=utf-8 # study is the database you need to create
    username: root
    password: 1234

create SecurityConfiguration in the config directory

/**
@ Author: ferry
@ Date 27/06/2026 22:49
 */
@Configuration
@EnableWebSecurity
class SecurityConfiguration {
    @Bean
    fun securityFilterChain(http: HttpSecurity): SecurityFilterChain {
        http {
            authorizeHttpRequests { // 配置哪些请求需要登录,哪些不用登录。
                authorize(anyRequest, authenticated)
                // anyRequest 所有请求
                // 必须已经登录
            }
            formLogin { // 开启 表单登录(Form Login)
                loginProcessingUrl = "/api/auth/login" // 登录提交地址
                // POST /api/auth/login , Security 会自动拦截
            }
            logout {
                logoutUrl = "/api/auth/logout"
            }
            csrf { // 配置 CSRF(Cross-Site Request Forgery,跨站请求伪造)保护
                disable()
            }
        }
        return http.build()
    }
}
csrf { // 配置 CSRF(Cross-Site Request Forgery,跨站请求伪造)保护
	disable()
}

By default, Spring Security requires all POST, PUT, DELETE, and PATCH requests to include a valid CSRF token, such as:

  • _csrf
  • X-CSRF-TOKEN
    If the request does not contain a valid CSRF token, Spring Security rejects it and returns:
    403 Forbidden
    In many frontend-backend separated applications, developers disable CSRF protection because authentication is usually handled with mechanisms such as JWT or API tokens instead of traditional HTML forms.
formLogin {
	loginProcessingUrl = "/api/auth/login" // 更改默认登录接口 只负责处理登录请求
	authenticationSuccessHandler = successHandler
	authenticationFailureHandler = failureHandler
}

loginProcessingUrl: Changes the default URL that Spring Security listens to for authentication requests.

The successHandler is a custom object (implementing AuthenticationSuccessHandler). Instead of redirecting, it typically writes a JSON response back to the frontend containing data like a JWT Token, user profile, or a success status code, and vice versa.

@Component
class LoginSuccessHandler : AuthenticationSuccessHandler {
    override fun onAuthenticationSuccess(request: HttpServletRequest,
                                         response: HttpServletResponse,
                                         chain: FilterChain,
                                         authentication: Authentication
    ) {}
 
    override fun onAuthenticationSuccess(request: HttpServletRequest,
                                         response: HttpServletResponse,
                                         authentication: Authentication
    ) {
        response.characterEncoding = Charsets.UTF_8.name()
        response.writer.write(JsonUtil.toJson(RestBean.success("login success")))
    }
}
@Component
class LoginFailureHandler : AuthenticationFailureHandler {
    override fun onAuthenticationFailure(request: HttpServletRequest,
                                         response: HttpServletResponse,
                                         exception: AuthenticationException
    ) {
        response.characterEncoding = Charsets.UTF_8.name()
        response.writer.write(JsonUtil.toJson(RestBean.failure(401, exception.message)))
    }
}

JsonUtil is a wrapper around Gson.

object JsonUtil {
    private val gson = Gson()
 
    fun toJson(any: Any): String {
        return gson.toJson(any)
    }
 
    fun <T> fromJson(json: String, clazz: Class<T>): T {
        return gson.fromJson(json, clazz)
    }
}

Custom Validation Logic

Write custom validation logic to handle a wide variety of dynamic scenarios.
Since custom validation is required, we need to implement either the UserDetailsService interface or the more feature-rich UserDetailsManager interface ourselves. For simplicity, we’ll choose to implement UserDetailsService directly.

@Service
class AuthorizeService(
    private val userService: UserService,
) : UserDetailsService{
    override fun loadUserByUsername(username: String): UserDetails {
//        println("loadUserByUsername $username, this method was invoked" +
//                "")
        val user = userService.findAccountByUsernameOrEmail(username)
            ?: throw UsernameNotFoundException("User not found")
        return User(
            user.username,
            user.password, // 必须是 String
            listOf() // 先不给权限,后面可以加 ROLE_USER
        )
    }
}

UserDetailsManager 是 UserDetailsService 的扩展(子接口)。

  • UserDetailsService(只读):
    • 只有一个方法:loadUserByUsername。
    • 它只负责读取用户数据,用来做登录认证。它管不到用户的注册、修改密码或注销。
  • UserDetailsManager(可读写):
    • 继承了 UserDetailsService。
    • 除了能读取用户,它还增加了管理(增删改)用户的方法,比如:createUser、updateUser、deleteUser、changePassword 和 userExists

第三个参数: listOf()
(权限/角色列表)

  • 类型:Collection<out GrantedAuthority>(在 Kotlin 中你传入了 listOf(),即一个空列表)
  • 含义:该用户所拥有的权限或角色集合。
  • 作用:用于后续的鉴权(Authorization)。比如你限制了某个接口只有管理员能访问(@PreAuthorize("hasRole('ADMIN')")),Spring Security 就会去检查这个列表里有没有 ROLE_ADMIN。

In addition to that, InMemoryUserDetailsManager is a built-in implementation provided by Spring Security. It implements the UserDetailsManager interface.

public class InMemoryUserDetailsManager implements UserDetailsManager, UserDetailsPasswordService 

把用户信息保存在内存(Memory)中(通常是一个 HashMap)→ 内存验证


Login Logic

Link to original

前端发送post请求

http://localhost:8080/api/auth/login

KeyValue
usernameuser
password’the password in the DB’

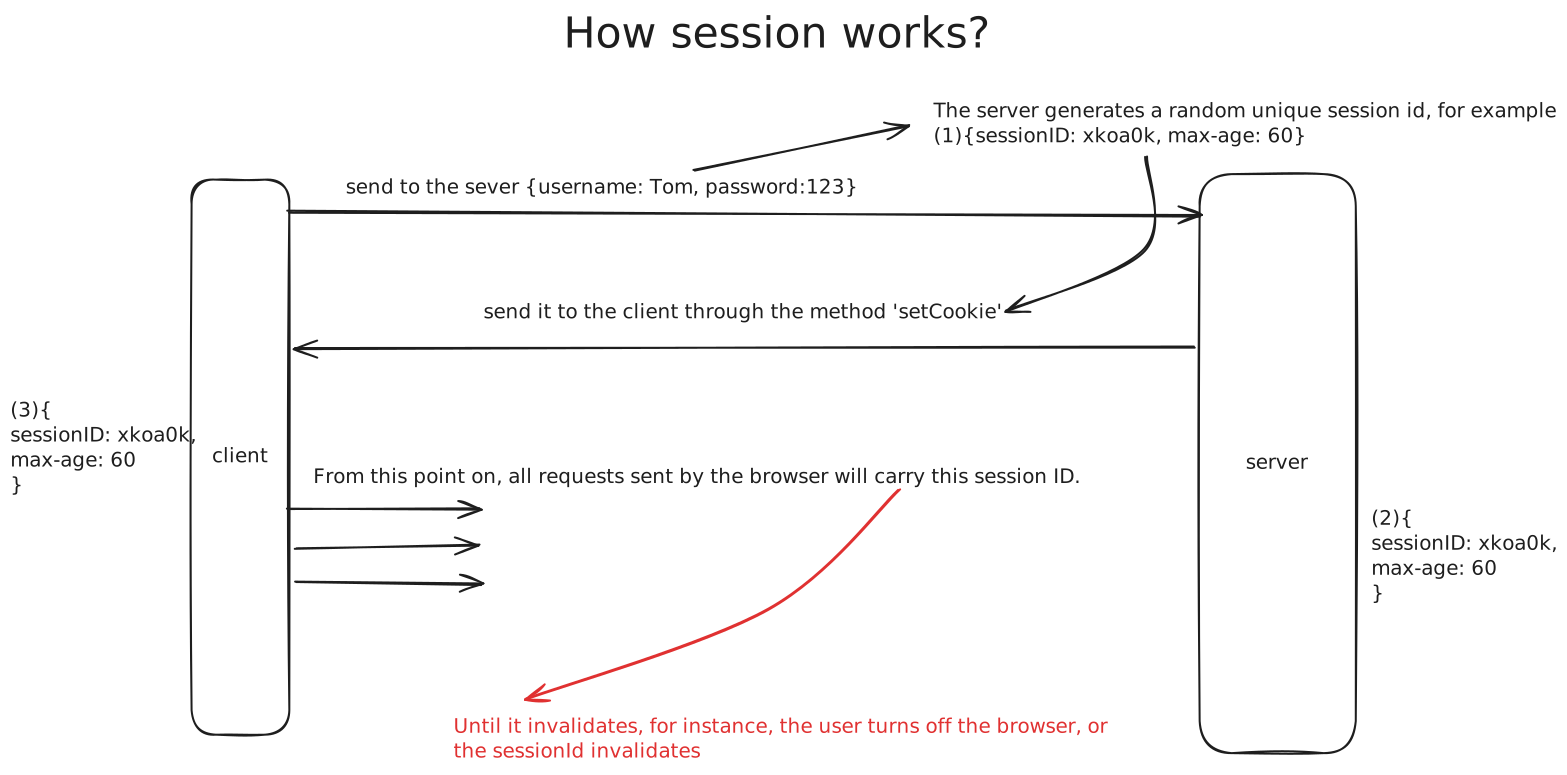
服务器返回一个JSESSIONID,之后浏览器每次访问都会携带这个id

NameValueDomainPathExpires / Max-AgeSizeHttpOnlySecureSameSitePartition KeyCross SitePriority
JSESSIONIDE616DD6B312C260D292EA72BB7D4B0DClocalhost/Session42✓Medium
属性 / Attribute值 / Value说明 / Explanation
NameJSESSIONIDServlet 容器的默认 Session Cookie 名称
Value随机生成的 32 字符哈希不可猜测,防 Session 劫持
Path/Cookie 对所有路径生效
HttpOnlytrueJavaScript 无法通过 document.cookie 读取,防止 XSS 攻击窃取 Session
Securetrue (HTTPS 时)仅通过 HTTPS 传输,防止中间人攻击
SameSiteLax (Spring Security 默认)防止 CSRF 攻击中跨站携带 Cookie
Max-Age未设置 (Session Cookie)浏览器关闭即删除(会话级 Cookie)

Remember Me Feature

CREATE TABLE `persistent_logins` (
    `series` varchar(64) NOT NULL,
    `username` varchar(64) NOT NULL,
    `token` varchar(64) NOT NULL,
    `last_used` datetime NOT NULL,
    PRIMARY KEY (`series`)
) ENGINE=InnoDB DEFAULT CHARSET=utf8mb4;

config SecurityFilterChain

@Configuration
@EnableWebSecurity
class SecurityConfiguration(
    private val persistentLoginService: PersistentLoginService
) {
    @Bean
    fun securityFilterChain(http: HttpSecurity, successHandler: LoginSuccessHandler, failureHandler: LoginFailureHandler, corsSource: CorsConfigurationSource): SecurityFilterChain {
    
            // ***
            rememberMe {
                rememberMeParameter = "remember" 
                rememberMeCookieName = "my_custom_remember_me_cookie"
                tokenRepository = persistentLoginService
            }
            // ***
        
        }
        return http.build()
        
        // ***
    }
}

rememberMeParameter: Specifies the request parameter used to indicate that the user wants to be remembered.
For example:

rememberMeParameter = "remember"

Then your login request should contain:

POST /login
username=admin
password=123456
remember=true

If the parameter exists, Spring Security enables the Remember Me feature.
If it is missing, Remember Me is ignored.

In this project, we use el-checkbox to wrapper the remember-me

<el-checkbox size="large" label="remember me" v-model="form.remember"></el-checkbox>

rememberMeCookieName: Specifies the name of the Remember Me cookie stored in the browser.

rememberMeCookieName = "my_custom_remember_me_cookie"

After clicking remermber-me, the browser will receive response like my_custom_remember_me_cookie=Vm91WTZ4eHY0R0xibDNOS1J5SHRudyUzRCUzRDp0Sjd6Mzl6d0dLNDhtRmZjVmQzZW1RJTNEJTNE; Expires=Fri, 24 Jul 2026 15:07:26 GMT; Max-Age=1209600; Path=/; HttpOnly


@Service
class PersistentLoginServiceImpl : PersistentLoginService, ServiceImpl<PersistentLoginMapper, PersistentLogin>(){
    override fun createNewToken(token: PersistentRememberMeToken) {
        save( // insert
            PersistentLogin(
                series = token.series,
                username = token.username,
                token = token.tokenValue,
                lastUsed = token.date
                    .toInstant()
                    .atZone(ZoneId.systemDefault())
                    .toLocalDateTime()
            )
        )
    }
 
    override fun updateToken(series: String, tokenValue: String, lastUsed: Date) {
        update(
            KtUpdateWrapper(PersistentLogin::class.java)
                .eq(PersistentLogin::series, series)
                .set(
                    PersistentLogin::token,
                    tokenValue
                )
                .set(
                    PersistentLogin::lastUsed,
                    lastUsed
                        .toInstant()
                        .atZone(ZoneId.systemDefault())
                        .toLocalDateTime()
                )
        )
    }
 
    override fun getTokenForSeries(seriesId: String): PersistentRememberMeToken? {
        val entity = getOne(
            KtQueryWrapper(PersistentLogin::class.java)
                .eq(PersistentLogin::series, seriesId)
        ) ?: return null
 
        return PersistentRememberMeToken(
            entity.username,
            entity.series,
            entity.token,
            Date.from(
                entity.lastUsed
                    .atZone(ZoneId.systemDefault())
                    .toInstant()
            )
        )
    }
 
    override fun removeUserTokens(username: String) {
        remove(
            KtQueryWrapper(PersistentLogin::class.java)
                .eq(PersistentLogin::username, username)
        )
    }
}

Verify Email Address

interface AuthorizeService : UserDetailsService{
    fun sendValidatedEmail(email: String): Boolean
}

create function sendValidatedEmail

@Service
class AuthorizeServiceImpl(
    private val userService: UserService
) : AuthorizeService {
    override fun loadUserByUsername(username: String): UserDetails {
        val user = userService.findAccountByUsernameOrEmail(username)
            ?: throw UsernameNotFoundException("User not found")
 
        return User(
            user.username,
            user.password, // 必须是 String
            listOf() // 先不给权限,后面可以加 ROLE_USER
        )
    }
	 // NOT implemented
    override fun sendValidatedEmail(email: String): Boolean {
        return false
    }
}
@RestController
@RequestMapping("/api/auth/")
class AuthorizeServiceController (
    private val service: AuthorizeService
){
    @PostMapping("/valid-email")
    fun validateEmail(@RequestParam("email") email: String): RestBean<String>{ // @RequestParam 获取请求参数
    log.info("Validating email: $email")
        return if (service.sendValidatedEmail(email))
            RestBean.success("sent email successfully")
        else
            RestBean.failure(HttpStatus.BAD_REQUEST.ordinal, "Invalid email")
    }
}

Send a POST request.

localhost:8080/api/auth/valid-email?email=2324512@qq.com
log.info("Validating email: $email") // Validating email: 2324512@qq.com

Spring Validation

Spring Validation allows developers to enforce data integrity and security by intercepting invalid incoming data before it reaches core business logic.

implementation("org.springframework.boot:spring-boot-starter-validation")
private const val EMAIL_REGEX : String = "^[a-zA-Z0-9._%+-]+@[a-zA-Z0-9.-]+\\.[a-zA-Z]{2,}$"
 
@Validated
@RestController
@RequestMapping("/api/auth/")
class AuthorizeServiceController (
    private val service: AuthorizeService
){
 
    private val log = com.ferryside.util.Log.logger<AuthorizeServiceController>()
 
    @PostMapping("/valid-email")
    fun validateEmail(@Pattern(EMAIL_REGEX)@RequestParam("email") email: String): RestBean<String>{ // @RequestParam 获取请求参数
        log.info("Validating email: $email")
        return if (service.sendValidatedEmail(email))
            RestBean.success("sent email successfully")
        else
            RestBean.failure(HttpStatus.BAD_REQUEST.ordinal, "Invalid email")
    }
}

When using annotations like @Pattern, the arguments passed into them must be compile-time constants.
So, we move EMAIL_REGEX to the top of the file (as a top-level constant, highly recommended)

Log in SpringBoot

fun main() {
    test()
}
 
//添加inline表示内联函数
inline fun test(){
    println("这是一个内联函数")
  	println("这是一个内联函数")
  	println("这是一个内联函数")
}
Link to original

To optimize performance, overhead can be eliminated by inlining lambda expressions. Using the inline keyword affects both the function itself and the lambdas passed to it, allowing the method call to be directly replaced by its execution code at compile time.

The so-called ‘inline expansion’ means that during compilation, the compiler directly replaces the place where you call the function with the function’s actual code. It’s just like ‘copying and pasting’ while writing code.

inline fun hello() {
    println("Hello")
}
fun main() {
    hello() // during [[compilation]],println("Hello") will replace hello()
}

reify → reified

import org.slf4j.Logger
import org.slf4j.LoggerFactory
object LogFactory {
    inline fun <reified T> logger(): Logger {
        return LoggerFactory.getLogger(T::class.java)
    }
}

How to understand?

Now there is still error during compilation.

inline fun <T> printType() {
}

With inline, we simply expand the function printType. It’s still useless.

{} // useless
// 必须同时使用 inline 和 reified
inline fun <reified T> printType() {
    println(T::class.java.name) 
}
 
fun main() {
    printType<String>()
    printType<Int>()
}

🛠️ 编译器的“展开”过程:
当编译器编译 main 函数时,它发现 printType 是一个内联函数,于是开始做“复制粘贴”,并且把 T 替换成具体的类型:

  1. 看到 printType<String>() 发现 T 是 String 把代码展开为:println(String::class.java.name)
  2. 看到 printType<Int>() 发现 T 是 Int 把代码展开为:println(Int::class.java.name)

Now, we can use log elegantly.

class UserService {
    private val log = LogFactory.logger<UserService>()
    fun register() {
        log.info("Hello")
    }
}

The modern way to use log in Springboot is:

@Slf4j
@Controller
public class MainController {
 
  	@ResponseBody
	 @GetMapping("/test")
    public User test(){
    		log.info("用户访问了一次测试数据");
    		return mapper.findUserById(1);
	 }
  
  	...
Link to original

Sending Email

implementation("org.springframework.boot:spring-boot-starter-mail")
spring:
  mail:
    host: smtp.qq.com
    port: 465
    protocol: smtp
    username: # Your Email Address
	 password: # Your Email Password
    default-encoding: UTF-8
    properties:
      mail:
        smtp:
          auth: true
          ssl:
            enable: true

移除本地application.yaml的跟踪

cd backend
git rm --cached src/main/resources/application.yaml

git rm -r --cached '需要移除git缓存的文件'
Link to original

@Service
class AuthorizeServiceImpl(
    private val mailSender: MailSender,
    @Value($$"${spring.mail.username}") // treated as ordinary String
    private val sendMail: String
) : AuthorizeService {
    override fun sendValidatedEmail(email: String): Boolean {
        /**
         * 1. 生成验证码
         * 2. 发送
         */
        val random = Random.nextInt(100000,1000000)
        val message = SimpleMailMessage().apply {
            from = sendMail
            setTo(email)
            subject = "Verification Code"
            text = "Your varication code is $random"
        }
        mailSender.send(message)
        return true
    }
}

https://kotlinlang.org/docs/strings.html#multi-dollar-string-interpolation
In regular string templates, a single dollar sign ($) starts interpolation. If you need to include literal dollar signs in a string, use multi-dollar string interpolation.
Multi-dollar string interpolation allows you to specify how many consecutive dollar signs are required to trigger interpolation. Dollar signs below that number are treated as literal characters.
For example, when you use $$ before a string literal, interpolation begins only with two consecutive dollar signs:

  • 你在字符串前面放几个 $,就代表必须连续出现几个 $ 才能触发 Kotlin 的变量解析。
  • 比如在 $$"..." 中,前面有两个 $。这代表只有当代码里出现 $${变量} 时,Kotlin 才会去解析它。
  • 如果只出现了一个单独的 $ (就像 Spring 的 ${...}),Kotlin 就会完全无视它,直接把它当成普通的文本字符串。

java to kotlin

@Value("${spring.mail.username}")
@Value($$"${spring.mail.username}")
private const val EMAIL_REGEX : String = "^[a-zA-Z0-9._%+-]+@[a-zA-Z0-9.-]+\\.[a-zA-Z]{2,}$"
@Validated
@RestController
@RequestMapping("/api/auth/")
class AuthorizeServiceController (
    private val service: AuthorizeService
){
    private val log = LogFactory.logger<AuthorizeServiceController>()
    @PostMapping("/valid-email")
    fun validateEmail(@Pattern(EMAIL_REGEX)@RequestParam("email") email: String): RestBean<String>{ // @RequestParam 获取请求参数
        log.info("Validating email: $email")
        return if (service.sendValidatedEmail(email))
            RestBean.success("sent email successfully")
        else
            RestBean.failure(HttpStatus.BAD_REQUEST.ordinal, "Invalid email")
    }
}

现在发送请求,应该能收到验证码

http://localhost:8080/api/auth/valid-email?email=yourEmail@qq.com

Store data in Redis using the session as the key

override fun sendValidatedEmail(email: String, session: HttpSession): Boolean {
	/**
	 * 1. 生成验证码
	 * 2. 把邮箱和对应的验证码存入 Redis(过期时间3分钟)
	 * 3. 发送验证码到指定邮箱
	 * 4. 如果发送失败,把 Redis里面的刚刚插入的内容删除
	 * 5. 用户在注册时,再从 Redis里面取出对应键值对,查看是否一致
	 */
	val key = "email: ${session.id}: $email"
	if(template.hasKey(key)){
			val expire = template.getExpire(key, TimeUnit.SECONDS)
			if(expire > 120)
				return false
	}
	val randomCode = Random.nextInt(100000,1000000)
	val message = SimpleMailMessage().apply {
			from = sendMail
			setTo(email)
			subject = "Verification Code"
			text = "Your varication code is $randomCode"
	}
	//  Operations for value
	template.opsForValue().set(key, randomCode.toString(), Duration.ofMinutes(3)) // 180s
	// After storing into redis, the `Time to Live` decreases
	
	mailSender.send(message)
	return true
}

Custom Failure Handler

我们还希望在认证失败或者是授权失败的情况下也能和我们的接口一样返回相同结构的json,这样可以让前端能对响应进行统一的处理。要实现这个功能我们需要知道SpringSecurity的异常处理机制。

在SpringSecurity中,如果我们在认证或者授权的过程中出现了异常会被ExceptionTranslationFilter捕获到。在ExceptionTranslationFilter中会去判断是认证失败还是授权失败出现的异常。

如果是认证过程中出现的异常会被封装成AuthenticationException然后调用AuthenticationEntryPoint对象的方法去进行异常处理。

如果是授权过程中出现的异常会被封装成AccessDeniedException然后调用AccessDeniedHandler对象的方法去进行异常处理。

所以如果我们需要自定义异常处理,我们只需要自定义AuthenticationEntryPoint和AccessDeniedHandler然后配置SpringSecurity即可。

Link to original

@Component
class UnauthorizedHandler : AuthenticationEntryPoint {
    override fun commence(
        request: HttpServletRequest,
        response: HttpServletResponse,
        authException: AuthenticationException
    ) {
        response.contentType = "application/json"
        response.characterEncoding = Charsets.UTF_8.name()
        response.status = HttpServletResponse.SC_UNAUTHORIZED
        response.writer.write(JsonUtil.toJson(RestBean.failure(401, "Not logged in. Please log in first.")))
    }
}
@Component
class ForbiddenHandler : AccessDeniedHandler {
    override fun handle(
        request: HttpServletRequest,
        response: HttpServletResponse,
        accessDeniedException: AccessDeniedException
    ) {
        response.contentType = "application/json"
        response.characterEncoding = Charsets.UTF_8.name()
        response.status = HttpServletResponse.SC_FORBIDDEN
        response.writer.write(JsonUtil.toJson(RestBean.failure(403, "Access denied.")))
    }
}

register these two class as beans, and config the securityFilterChain

exceptionHandling {
	authenticationEntryPoint = unauthorizedHandler
	accessDeniedHandler = forbiddenHandler
}

Register Page

const formRef = ref()
const isEmailValid = ref(false)
const form = reactive({
  userName: "",
  password: "",
  password_confirmation: "",
  email: '',
  code: ""
})
 
const registerForm = ()=>{
  formRef.value.validate((valid)=>{
    if(valid){
      post("/api/auth/register",{
        username: form.userName,
        password: form.password,
        email: form.email,
        code: form.code,
      }, ()=>{
        router.push("/");
      })
    } else
      ElMessage.error('Please fill in all fields');
  })
}
<el-form :rules="rules" :model="form" @validate="onValidate" ref="formRef"> 
 
 
	<el-form-item style="margin: 20px auto 0;width: 70%;" prop="code">
		<div style="display: flex; gap: 3px">
			<el-input placeholder="Enter your verification code" type="email" v-model="form.code" style="width: 70%">
				<template #prefix>
					<el-icon><Clock /></el-icon>
				</template>
			</el-input>
			<el-button style="padding: 5px" class="verify-btn" type="success" :disabled="!isEmailValid" @click="sendValidatedEmail">
				{{ countdown > 0 ? `Resend in ${countdown}s` : 'Get the verification code' }}
			</el-button>
		</div>
	</el-form-item>
</el-form>
 
<el-button style="width: 270px;margin: 20px auto 10px;" type="warning" plain @click="registerForm">Register</el-button>
@PostMapping("/register")
fun register(@Pattern(USERNAME_REGEX)@Length(min = 2, max = 8)@RequestParam("username") username: String,
						 @RequestParam("password")@Length(min = 6, max = 16) password: String,
						 @RequestParam("email") email: String,
						 @RequestParam("code")@Length(min = 6, max = 6) code: String,
						 ): RestBean<String>{
	val msg = service.validateAndRegister(username, password, email, code)
	return if(msg == "注册成功"){
		RestBean.success(msg)
	} else{
		RestBean.failure(HttpStatus.BAD_REQUEST.ordinal, msg)
	}
}

因为现在的 JavaScript 越来越流行使用 async/await(异步终极解决方案),Element Plus 官方其实还支持另外一种不用写回调函数的更现代的写法。
如果你的项目中以后用到了很多异步操作,你可以把你的 registerForm 改写成这样(它和你的原代码效果完全一样):

const registerForm = async () => {
  try {
    // 1. 直接用 await 等待校验结果
    // 如果校验失败,它会直接抛出错误跳到 catch 块,不会往下走
    await formRef.value.validate()
    // 2. 校验成功后,才会执行这里的注册逻辑
    post("/api/auth/register", {
      username: form.userName,
      password: form.password,
      email: form.email,
      code: form.code,
    }, () => {
      router.push("/");
    })
  } catch (error) {
    // 3. 只要校验失败,或者接口报错,都会进到这里
    ElMessage.error('Please fill in all fields');
  }
}

Frontend

Open terminal on our module-level

G:\IdeaProjects\separatedProjectBasedOnSession>

npm create vue@latest

include vue-router and pinia

now the directory should be like this:

└── separatedProjectBasedOnSession
    ├── .idea/
    ├── backend/
    ├── frontend/
    └── separatedProjectBasedOnSession.iml

open project structure, select module and mark the folder frontend as a module.

Axios wrapper

This is outdated. But it is still common in Vue 2.

npm install --save axios vue-axios

Since, the project we created is Vue 3. Use this line below instead.

npm install axios

After finishing this, install ts, it can make the codes more readable.

npm install -D typescript

Encapsulate an Axios HTTP request method

function post(url: string, data: object,
              success: (message: string, status: number) => void,
              failure = defaultFailure,
              err = defaultError) {
    axios.post(url, data,{
        headers: { // config Request Header
            'Content-Type': 'application/x-www-form-urlencoded;charset=UTF-8', // the data will be sent looking like a traditional HTML form submission
        },
        withCredentials: true // include cookies automatically in the request
    }).then(({data})=>{ // 接受相应,解构 data
        if(data.success){
            success(data.message, data.status)
        } else{
            failure()
        }
    }).catch(err)
}

Now we can invoke this method after clicking the login button.

const login = () =>{
  if(form.username && form.username.length > 0){
    post('/api/auth/login', { // pass the object to the method 'post'
      username: form.username,
      password: form.password,
      remember: form.remember,
    }, (message)=>{
      ElMessage.success(message)
      router.push('/index')
    })
  } else{
    ElMessage.warning("Please enter username and password")
  }
}

Callback function

function createFn() {
    return function () {
        console.log("我是被返回的函数")
    }
}
 
const fn = createFn()   //调用函数返回一个函数
fn()  //在调用函数返回的函数
Link to original

通过 ref,可以绑定普通类型。
也可以通过 reactive() 绑定对象,这是另一种声明响应式状态的方式。

Link to original

const isEmailValid = ref(false)
 
// define a function that is prepared to be invoked by Element Plus
const onValidate = (prop, isValid) => {
  if (prop === 'email') {
    isEmailValid.value = isValid
  }
}
<el-form
  :rules="rules"
  :model="form"
  @validate="onValidate"
/>

@validate Event: The <el-form> component emits a validate event whenever a form item undergoes validation (either on blur, on change, or during a manual form submission check).
Arguments Passed: Element Plus automatically passes two main arguments to the callback function:

  • prop: A string representing the field’s property name (matching the prop attribute on <el-form-item>).
  • isValid: A boolean indicating whether the field passed its validation rules.
    State Management: The onValidate function filters for the 'email' property and updates the reactive isEmailValid ref accordingly. This allows you to conditionally enable submit buttons, display custom UI alerts, or trigger side effects based on the real-time validity of the email field.

Common issues

c.f.backend.BackendApplicationKt         : Starting BackendApplicationKt using Java 21.0.3 with PID 22488
2026-06-27T22:42:10.695+08:00 INFO 22488 --- [backend] ``[ionShutdownHook] com.zaxxer.hikari.HikariDataSource : HikariPool-1 - Shutdown initiated…
2026-06-27T22:42:10.714+08:00 INFO 22488 --- [backend] [ionShutdownHook] com.zaxxer.hikari.HikariDataSource : HikariPool-1 - Shutdown completed

Based on the logs you provided, your project actually completed its startup successfully without any errors (Started BackendApplicationKt in 1.452 seconds).
However, immediately after starting, it triggered a ShutdownHook, which closed the database connection pool (HikariPool-1 - Shutdown completed) and terminated the process.
The most common reason for a Spring Boot project to close automatically right after starting is: Your project is missing the Web Starter dependency. Without it, Spring Boot treats your application as a standard command-line program. It initializes everything (like connecting to your MySQL database), realizes it has no tasks left to perform, and gracefully shuts down.

implementation("org.springframework.boot:spring-boot-starter-web")

No primary or single unique constructor found for interface

java.lang.IllegalStateException: No primary or single unique constructor found for interface

@PostMapping("/reset-password")
fun resetPassword(userService: UserService, @RequestParam("password")password: String, @RequestParam("email") emailAddress: String): RestBean<String>{
		val email = session.getAttribute("resetting-password")
		if(email == "" || email == null){
				return RestBean.failure(400,"Verify your email first")
		}
		userService.updatePassword(emailAddress, password)
		return RestBean.success("reset password successfully")
}

That exception happens because Spring MVC is trying to treat your UserService parameter in the controller method as a data object to bind from the HTTP request, rather than injecting it as a service bean.
By default, any complex object parameter in a Spring @RequestMapping (like @PostMapping) that isn’t explicitly annotated is treated by Spring as a @ModelAttribute. Spring looks at UserService (which is an interface), tries to find a constructor to instantiate it to pass request data into it, and fails with IllegalStateException.
Here is the exact issue and how to fix it:

@RestController
@RequestMapping("/auth") // or whatever your base path is
class AuthController(
    // Inject the service here via constructor injection
    private val userService: UserService 
) {
    @PostMapping("/reset-password")
    fun resetPassword(
        @RequestParam("password") password: String, 
        @RequestParam("email") emailAddress: String,
        session: HttpSession // Make sure session is passed or injected if needed
    ): RestBean<String> {
        val email = session.getAttribute("resetting-password") as? String
        if (email.isNullOrEmpty()) {
            return RestBean.failure(400, "Verify your email first")
        }
        // Use the class-level injected service
        userService.updatePassword(emailAddress, password)
        return RestBean.success("Reset password successfully")
    }
}

Terminal tips

In the terminal, the command to move to the parent directory (one level up) is very simple. You can use the following command:

cd ..

Database

create a table in the database study

CREATE TABLE users (
    id INT NOT NULL AUTO_INCREMENT,
    username VARCHAR(255),
    password VARCHAR(255),
    email VARCHAR(255),
    PRIMARY KEY (id)
);

Insert a row into this table

INSERT INTO users (id, username, password, email)
VALUES (1, 'admin', 'the password that must be encoded', NULL);

get the encoded password through springBoot test

@SpringBootTest
class BackendApplicationTests {
    @Test
    fun contextLoads() {
        println("encoded password:")
        println(BCryptPasswordEncoder().encode("1234"))
        // $2a$10$7LKuHtw0NHl3NsK1v3pL4.CQvcuCrbnGkncyKJ9EAgNLRayQapNue
    }
}

Connect to the database

implementation("com.baomidou:mybatis-plus-spring-boot4-starter:3.5.13")

Deploy to Github Pages

Deploy a vue project.
由于 GitHub Pages 的默认 URL 格式通常是 https://<username>.github.io/<repository-name>/,你需要确保打包后的静态资源路径正确:

export default defineConfig({
  plugins: [
    vue(),
    vueDevTools({
        launchEditor: 'idea',
    }),
  ],
 
  resolve: {
    alias: {
      '@': fileURLToPath(new URL('./src', import.meta.url)),
    },
  },
 
  base: '/separatedProjectBasedOnSession/', // <你的仓库名>
})
const router = createRouter({
  history: createWebHashHistory(import.meta.env.BASE_URL), // change to HashHistory
  routes: [
    {
      path: '/',
      name: 'home',
      component: HomeView,
    },
    {
      path: '/index',
      name: 'index',
      // route level code-splitting
      // this generates a separate chunk (About.[hash].js) for this route
      // which is lazy-loaded when the route is visited.
      component: () => import('../views/AboutView.vue'),
    },
    {
      path: '/register',
      name: 'register',
      component: () => import('../components/RegisterPage.vue'),
    }
  ],
})

create the file .github/workflows/deploy.yml in the source directory

name: Deploy Frontend to GitHub Pages
 
on:
  # 监听 push 到 main 分支(如果你的默认分支是 master,请改为 master)
  push:
    branches:
      - master
 
  # 允许在 Actions 页面手动触发
  workflow_dispatch:
 
# 设置 GITHUB_TOKEN 的权限,允许部署到 GitHub Pages
permissions:
  contents: read
  pages: write
  id-token: write
 
# 允许一个并发部署,跳过正在运行的部署
concurrency:
  group: "pages"
  cancel-in-progress: true
 
jobs:
  deploy:
    environment:
      name: github-pages
      url: ${{ steps.deployment.outputs.page_url }}
    runs-on: ubuntu-latest
    steps:
      - name: Checkout
        uses: actions/checkout@v4
 
      - name: Set up Node.js
        uses: actions/setup-node@v4
        with:
          node-version: 20
          cache: 'npm'
 
      - name: Install dependencies
        # 使用全局绝对路径变量,精准定位到前端目录
        working-directory: ${{ github.workspace }}/frontend
        run: npm install
 
      - name: Build project
        # 使用全局绝对路径变量
        working-directory: ${{ github.workspace }}/frontend
        run: npm run build
 
      - name: Setup Pages
        uses: actions/configure-pages@v4
 
      - name: Upload artifact
        uses: actions/upload-pages-artifact@v3
        with:
          # 同样使用绝对路径指定打包产物
          path: '${{ github.workspace }}/frontend/dist'
 
      - name: Deploy to GitHub Pages
        id: deployment
        uses: actions/deploy-pages@v4

After pushing…
Open your GitHub repository, go to Settings → Pages.
Under Build and deployment → Source, select GitHub Actions (do not select Deploy from a branch).

Difference between workflows and actions

FolderWhat’s inside?Responsibility
.github/workflows/放 .yml 配置文件。定义整个自动化的触发时机(如 push)和整体流程(Pipeline)。
.github/actions/放子文件夹(包含 action.yml 和代码)。执把某一段特定的、可能重复使用的代码(如特定步骤的脚本)封装起来。

If my-custom-build exits, How to use it(workflows.yml) in a workflow?

jobs:
  build-and-deploy:
    runs-on: ubuntu-latest
    steps:
      - name: Check out repository
        uses: actions/checkout@v4
 
      # 调用本地 .github/actions/my-custom-build 目录下的自定义 Action
      - name: Run my local custom action
        uses: ./.github/actions/my-custom-build
Typescript in this project

const validatePassword = (rule: FormItemRule, value: string, callback: (error?: Error) => void) => {
  if (value === '') {
    callback(new Error('Password is required'));
  } else if (value !== form.password) {
    callback(new Error("Two inputs don't match"));
  } else {
    callback()
  }
}
callback: (error?: Error) => void
 
// 使用这个函数 callback() 可以不传参数
  • callback 是一个函数
  • 接受一个参数 error
  • error 的类型是 Error
  • ? 表示这个参数可以省略(optional parameter)
  • 函数没有返回值(void)
(error: Error?) -> Unit
// 跟 kotlin 不一样,这里的 `?` 是可空类型 (Nullable)

const countdown = ref(0)       // 倒计时秒数
let timer: number | undefined = undefined
 
const sendValidatedEmail = () => {
  console.log("Sending email")
  post('/api/auth/valid-email-reset', {
    email: form.email
  }, (message) => {
    countdown.value = 60
    ElMessage.success(message)
    // 如果之前有未清除的定时器,先清除,防止重复触发
    if (timer) clearInterval(timer)
    timer = window.setInterval(() => {
      countdown.value--
      if (countdown.value <= 0) {
        clearInterval(timer)
      }
    }, 1000)
  }, (message) => {
    ElMessage.error(message)
  })
}
let timer: number | undefined = undefined

| 叫做 联合类型(Union Type)。
timer 的值可以是 number 或 undefined。
初始值为 undefined

timer = 123         // ✅ number
timer = undefined   // ✅ undefined

Record 和 URLSearchParams

  1. Record<string, any>
    先看你的函数参数:
data: Record<string, any>

Record 是什么?
Record 是 TypeScript 提供的一个泛型工具类型(Utility Type)。
它的定义大概可以理解成:

type Record<K, T> = {
    [P in K]: T
}

意思就是:

键(Key)的类型是 K,值(Value)的类型是 T。


你的例子

Record<string, any>

表示

key   -> string
value -> any

也就是:

{
    username: ...
    password: ...
    email: ...
}

任何字符串都可以作为 key。
例如:

const user: Record<string, any> = {
    username: "Tom",
    age: 18,
    married: false
}

都是合法的。


为什么不用 object?
假设写成

data: object

那么

data.username

TypeScript 会报错。
因为它只知道

“这是一个 object”
不知道里面有什么。
而

Record<string, any>

告诉 TS:

“这是一个字符串 → 任意值 的 Map”
所以

for(const key in data){
    console.log(data[key])
}

就是合法的。


Kotlin 对应
这个最像

Map<String, Any>

例如

val data = mapOf(
    "username" to "Tom",
    "password" to "123456"
)

和 TS

const data: Record<string, any> = {
    username: "Tom",
    password: "123456"
}

几乎一个意思。


  1. URLSearchParams
    下面这段
const params = new URLSearchParams();

它不是 TypeScript 的东西。
而是

浏览器提供的 JavaScript API。
作用:
把对象转换成 URL 编码格式。


例如
有

const data = {
    username: "Tom",
    password: "123456"
}

执行

const params = new URLSearchParams();
for(const key in data){
    params.append(key, data[key])
}

实际上等价于

params.append("username","Tom")
params.append("password","123456")

最后
params里面存的是

username=Tom&password=123456

这就是 HTML Form 提交的数据格式。


append()
例如

params.append("username","Tom")
params.append("password","123456")

得到

username=Tom&password=123456

如果

params.append("email","abc@gmail.com")

变成

username=Tom&password=123456&email=abc@gmail.com

axios 发送的时候
你这里

axios.post(url, params,{
    headers:{
        'Content-Type':'application/x-www-form-urlencoded;charset=UTF-8'
    }
})

浏览器真正发送的是

POST /api/auth/login
Content-Type: application/x-www-form-urlencoded
username=Tom&password=123456

Spring Boot

@PostMapping
fun login(
    @RequestParam username:String,
    @RequestParam password:String
)

就可以直接接收到。


如果不用

URLSearchParams

而直接

axios.post(url,data)

发送的是

{
    "username":"Tom",
    "password":"123456"
}

Content-Type 会变成

application/json

这时候 Spring 就应该写成

@PostMapping
fun login(
    @RequestBody dto: LoginVO
)

而不是 @RequestParam。


为什么这里要循环?
因为

data

只是普通对象:

{
    username:"Tom",
    password:"123456"
}

URLSearchParams 并不知道里面有哪些字段,所以要遍历:

for(const key in data){
    params.append(key,data[key])
}

最终得到:

username=Tom&password=123456

Record<string, any>
        │
        ▼
{
    username:"Tom",
    password:"123456"
}
        │
        ▼
for...in
        │
        ▼
URLSearchParams
        │
        ▼
username=Tom&password=123456
        │
        ▼
axios.post(...)
        │
        ▼
Spring @RequestParam

更现代的写法
如果 data 是一个普通对象,其实也可以更简洁地写:

const params = new URLSearchParams(data as Record<string, string>);

或者(如果值不全是字符串):

const params = new URLSearchParams();
Object.entries(data).forEach(([key, value]) => {
    params.append(key, String(value));
});

这样会比 for...in 更符合现代 JavaScript 的写法。